1. Understand the concept of multimedia technology;
2. Understand the method of making multimedia materials;
3. Learn to use 3DSMAX for animation creation.
2. Experimental preparation knowledgeMultimedia technology is a technology developed with the development of computer technology. As a processing object of multimedia technology, a variety of media materials are increasingly mature. Using the application software that comes with WINDOWS, we can make some audio files and image files; use some word processing software to process text, hypertext files, and so on. We can also compile applications with multimedia processing capabilities to process a variety of media materials. In the combined processing mode of software and hardware, even tactile information can be processed in real time.
Any computer is a system with multimedia processing capabilities. With an ordinary computer equipped with WINDOWS98, we can process a series of media materials such as text, hypertext, sound, image, animation and so on. There are many third-party software that can process multimedia information. In this experiment, we learn to use the 3D Studio MAX software to create our own animation. In the follow-up experiments, we will further take the performance and transmission of multimedia materials as experimental content.
3D Studio MAX is an integrated, interactive, and object-oriented 3D working environment for computer graphics professionals, making it easy to model, render, and animate. 3D Studio MAX is a powerful and full-featured animation production tool designed for 3D production. It has powerful rendering capabilities and can produce high-quality professional-level effects. 3D Studio MAX is specially designed for Windows NT: Because it is designed for NT from the bottom, MAX can give full play to the advantages of NT. 3D Studio MAX is designed to meet the expansion needs: use MAX Script and MAX SDK to develop extension functions-without any additional cost, use the external plug-in module (PLUGINS) application to extend the function.
3. Experimental requirements(Please read the appendix about the basic knowledge of 3DSMax animation before starting the experiment)
1. List and record the applications related to media production under WINDOWS NT.
2. Make a moving object by learning the basic operation of using 3DSMAX; dye the object.
3. Learn how to set various storage formats in 3DSMAX.
4. Learn the use of light sources (make the animation you make have lighting effects, or have moving light sources).
5. Learn the use of MAXScript, and record all your actions in the above experimental steps into a MAXScript file.
6. Check out the example animation of 3DSMAX. The example directory is the Scenes subdirectory under the 3DSMAX installation directory. such as: D: \ 3dsmax3_1 \ Scenes \ (you can open the * .max file in this directory to watch the animation effect of the example)
Four, thinking questions1. What is multimedia technology?
2. What are multiple media? What types of media do you know? How should they be made?
3. Which formats of animation storage does 3D Studio MAX support?
Appendix 3DMAX animation production 1. Brief description of 3D Studio MAX function3D Studio MAX (referred to as 3DS MAX) is a subsidiary of Autodesk KineTIx based on the well-known 3D modeling and animation rendering software 3D Studio, after redesigned under the WindowNT system platform 3D animation software. It is truly realized in the PC environment Features comparable to high-end UNIX workstations. For engineering designers, 3DS MAX is playing an increasingly important role in the process of static rendering, dynamic roaming, product simulation and the realization of virtual reality. 3DS MAX is an upgraded version of 3D Studio that everyone is familiar with. The operating platform has been upgraded from DOS to WINDOWS NT or Windows 95/98. After the redesign of Autodesk, this software is completely different from the inside out, and the function is also a qualitative leap than in the past. Here are just some of the main points that everyone cares about are as follows:
1. 3DS MAX directly supports Chinese. In WINDOWS NT Chinese version 3.51 / 4.0, you can directly use TTF font to input Chinese and stretch to generate three-dimensional. It is worth mentioning that although the Chinese version of Windows 95 can be used to input Chinese, due to the flaw of the Chinese version of the Chinese version of Windows, the parameters of 3DS MAX cannot be displayed and input. You can use the Chinese version of WINDOWS NT4.0, and you can also dialog the display properties The text in the box is changed to 120%, and the display resolution is changed to 1280X1024 to solve the problem.
2. The original four interfaces are merged into one, and the function switching between two-dimensional editing / three-dimensional lofting / three-dimensional modeling / animation editing can be performed with just one mouse click.
3. The concept of editing stack is newly introduced. It is more convenient than UNDO in that it can directly list each previous editing operation, directly return to the past operation, change various parameters in it, and even modify the history, affecting "today"!
4. The new parametric design concept is provided, and all basic shapes and modifications are controlled by precise parameters, which is indeed superior to 3DS.
5. New features of 3D Studio MAX in design modeling
Parametric design: 3DS MAX can perform parametric design for basic modeling and modification of objects to achieve precise modeling. 3DS R4 does not have this feature.
6. Editing stack: 3DS MAX introduces the concept of editing stack, which is a more advanced operation than UNDO. It can remember all the operation process for the object, and can modify and edit at any time. It reflects that 3DS MAX is a fully object-oriented operating system. 3DSMAX can also set multiple UNDO and REDO operations. 3DS R4 does not have this feature.
Patch editing: 3DS MAX entity editing is not limited to 3DS R4 mesh (Mesh) editing, but also adds patch editing (patch), so that 3DS MAX can make more complex entities quickly and easily.
7. Volume light (Volume light) effect: The volume light effect added by 3DS MAX makes the production of light beams ready, and noise can also be added, so that the particle dust in the light beam is reflected in the picture. It is difficult to achieve this effect in 3DS R4.
8. Free camera: Free camera is added to 3DS MAX to simplify setting the camera. Remove the target point and make the camera roaming production quite easy.
9. Compatible with multiple input and output formats: the input and output of the 3D model can be adapted to all file formats of Autodesk, such as .dxf, .dwg, .3ds,
The input and output of .prj and other image files can be adapted to most standard formats, such as jpg, tga, TIf, bmp, gif, etc.
10. Real-time rendering rendering display: The window of 3DS MAX can switch the wireframe and smooth + highlight display model of the model at any time, and the texture map of the attached material can also be displayed at any time. Do what you build is what you get. Compared with 3DS R4, the design visualization is greatly improved.
11. Material editor: 3DS MAX provides richer materials and more material options. Make complex materials easier. You can also use an unlimited number of texture effects, while 3DS R4 is limited to two.
12. Advanced Boolean operations: The Boolean operations of 3DS MAX are non-destructive Boolean operations, which can re-edit the sub-objects after the Boolean operations, and also support nested Boolean operations.
13. Text input: Chinese and Western characters can be easily entered (as long as Chinese Windows 95 or Windows NT), and all Truetype fonts are supported, and the input fonts can be easily formed into entities. Eliminate the cumbersome font creation method in the past 3DS R4.
2. Introduction to the 3DSMAX environmentAfter running "d: \ 3dmax25 \ 3dsmax.exe" and entering the 3DS design interface, you can see that the entire window is composed of 4 parts.
1. There are menus and toolbars such as "File", "Edit", and "tools" in the upper part of the window;
2. There is also a graphical menu on the right of the window. With this menu, you can set the relevant attributes of the object;
3. At the same time, we can see that there are 4 windows on the screen: "Top", "Front", "Left" and "PerspeTIve";
4. There is also a graphical menu in the lower part of the window, which is related to the animation part.
Usually, we can use 3DS to make detailed pictures or complete animations. In the following part of this article, we will use examples to show how to make a picture; how to make a complete animation; how to save the created animation in AVI format. These are the basics of making animation with 3DS. As for how to use 3DS for creation, please refer to relevant books for interested students.
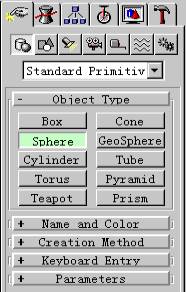 |  | ||
According to the following steps, you can place a sphere. Select the menu "Geometry" in the right part of the window and open "Object Type"; select "Sphere". As shown in the left picture below:
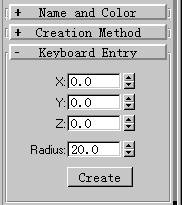
Open "Keyboard Entry" (the result is shown on the right above), enter the coordinates of the sphere center in the X, Y, Z coordinate input boxes; enter the radius of the sphere in the "Radius" input box; then click the button "Create" . Then you can use 3DSMAX
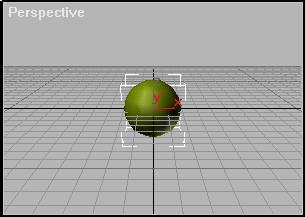 |
See the sphere you created on the 4 windows. The figure below shows the results seen on the "" window. Fourth, how to make an animation
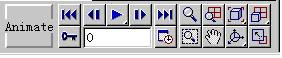 |
Using 3DS to create animations is very simple. Note that there are the following graphic menus at the bottom of the window:
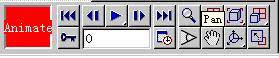 |
When you need to create an animation, you need to press the "animate" button.
In the setting of 3DS, one animation has a total of 100 frames, and the number displayed in the input box of the menu is the current frame number. Follow the steps below to generate an animation:
1. Enter "0" in this input box, and press the lock button (the button on the left of the input box) to start the frame, edit each window, this is the first image in the entire animation.
2,
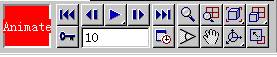 |
Click the lock button again, and enter "10" to edit the image of the 10th frame,
 |
Press the lock button again, then change the position of the sphere.
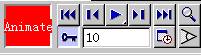
3. Operate in sequence, edit the image every 10 frames, and change the position of the sphere. Until editing to the 100th frame.
4. Preview the animation. Select the sub-option "Make Preview" of "Rendering" in the upper menu of the screen to get the following pop-up window, click the "Create" button. Then start to generate AVI format animation.
 |
Select the sub-option "Render" of "Rendering" in the upper menu of the screen to get the following pop-up window.
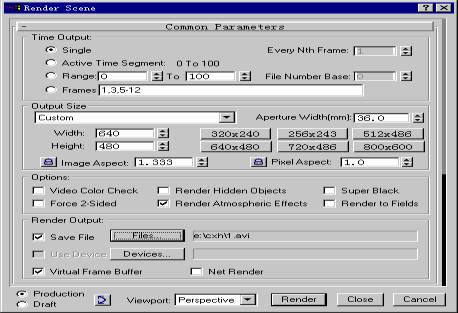 |
Click the "File" button. The following interface will pop up to select the output format of the animation.
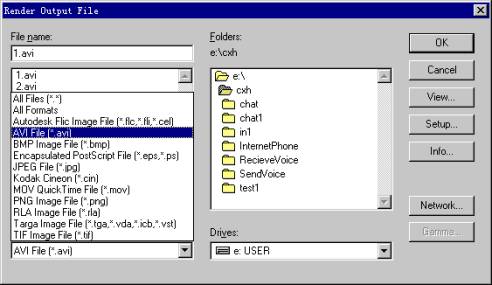 |
Sixth, the use of MAXScript
Create a text file with the suffix "ms" (for example: e: est.ms), as shown below. It can be created with any text editor, or it can be done by selecting "New Script" in the 3D Studio Max menu "MaxScript".
macros.run "Objects" "Sphere"
Sphere radius: 14.4704 smooth: on segs: 32 chop: 0 slice: off sliceFrom: 0 sliceT0 pos: [-148.495,84.9498,0] isSelected: on
set animate on
sliderTIme = 100f
move $ [193.172, -151.558,0]
Select "Run Script" in the "MaxScript" menu of 3D Studio Max to run the script created above. (1) Observe the effect; (2) Select "MAXScript Listener" in the "MaxScript" menu of 3D Studio Max, and you can start to view the currently operated Script code (window shown below).
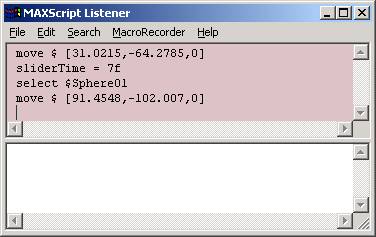
The Script in 3DS Max is very similar to the macro in Office. Any operation in 3DSMax can be expressed as a line of Script code. (Interested students can familiarize themselves with the macro operation in Office).
Distribution Transformer,2500Kva Transformer,High Quality 1250Kva Transformer,High Quality 800Kva Transformer
Hangzhou Qiantang River Electric Group Co., Ltd.(QRE) , https://www.qretransformer.com